Blyott (ArubaOS/Aruba Instant 8.8.x.x or higher)
Table of contents
This example shows the required configuration to enable the Blyott location based and monitoring solution integration using ArubaOS/Aruba Instant version 8.8.x.x or higher.
A configuration guide for ArubaOS 8.7.x or lower is available here: Blyott Aruba configuration guide 8.7.x
The Blyott solution integration uses the BLE data transport service with the device class blyott to report location (RSSI), temperature and battery level information in a custom BLE advertisement format in real-time to the cloud-based backend/dashboard.
access-token- has to be replaced with the static access token used to connect to the remote serverclient-id- (optional) has to be replaced with the client identifier string that is used by the remote server to identify the connecting Aruba infrastructure, e.g. “Aruba-Wi-Fi”.ap-group- has to be replaced with the AP group name the configuration should be enabled on (multiple statements are required for multiple groups) (ArubaOS only)
Note:
The Let’s Encrypt certificate chain of trust has to be installed on the Aruba infrastructure for the secure HTTP or secure websocket connection to the Blyott connection proxy (wss://mobileproxy.blyott.com/aruba). The Blyott server URL currently use a server certificate issued by the Let’s Encrypt R3 intermediate CA, which is signed by the Let’s Encrypt ISRG Root X1 certificate authority. The complete certificate chain have to be installed.Aruba deployment’s trusted CA configuration would have to be updated in case the to the server certificate changes!
Please see the Aruba CLI Reference - Importing Certificates for details.
ArubaOS
ArubaOS CLI Configuration
iot radio-profile "ble-int"
    radio-mode none ble
!
ap-group <ap-group>
    iot radio-profile "ble-int"
!
iot transportProfile "blyott"
    serverType Telemetry-Websocket
    serverURL "wss://mobileproxy.blyott.com/aruba"
    clientId "Aruba-WiFi"
    accessToken <access-token>
    deviceClassFilter blyott
    reportingInterval 3600
    ageFilter 30
    bleDataForwarding
    include-ap-group <ap-group>
!
iot useTransportProfile "blyott"
ArubaOS GUI Configuration
The ArubaOS GUI configuration example shows the configuration steps for an ArubaOS setup leveraging an Aruba Mobility Conductor to manage multiple Aruba controllers/controller clusters.
For Aruba standalone controller setups the same configuration settings apply but are directly configured in the corresponding Aruba Mobility Controller settings instead of the Mobility Conductor “Managed Network” configuration hierarchy. Furthermore, Aruba standalone controller setups does not provide any IoT dashboard.
Note:
The example screenshots provided below shows the ArubaOS version 8.9 GUI. Even if the ArubaOS version 8.8 GUI has a slightly different look and feel the same configuration settings still apply.
-
Login to the Aruba Mobility Conductor web interface.
-
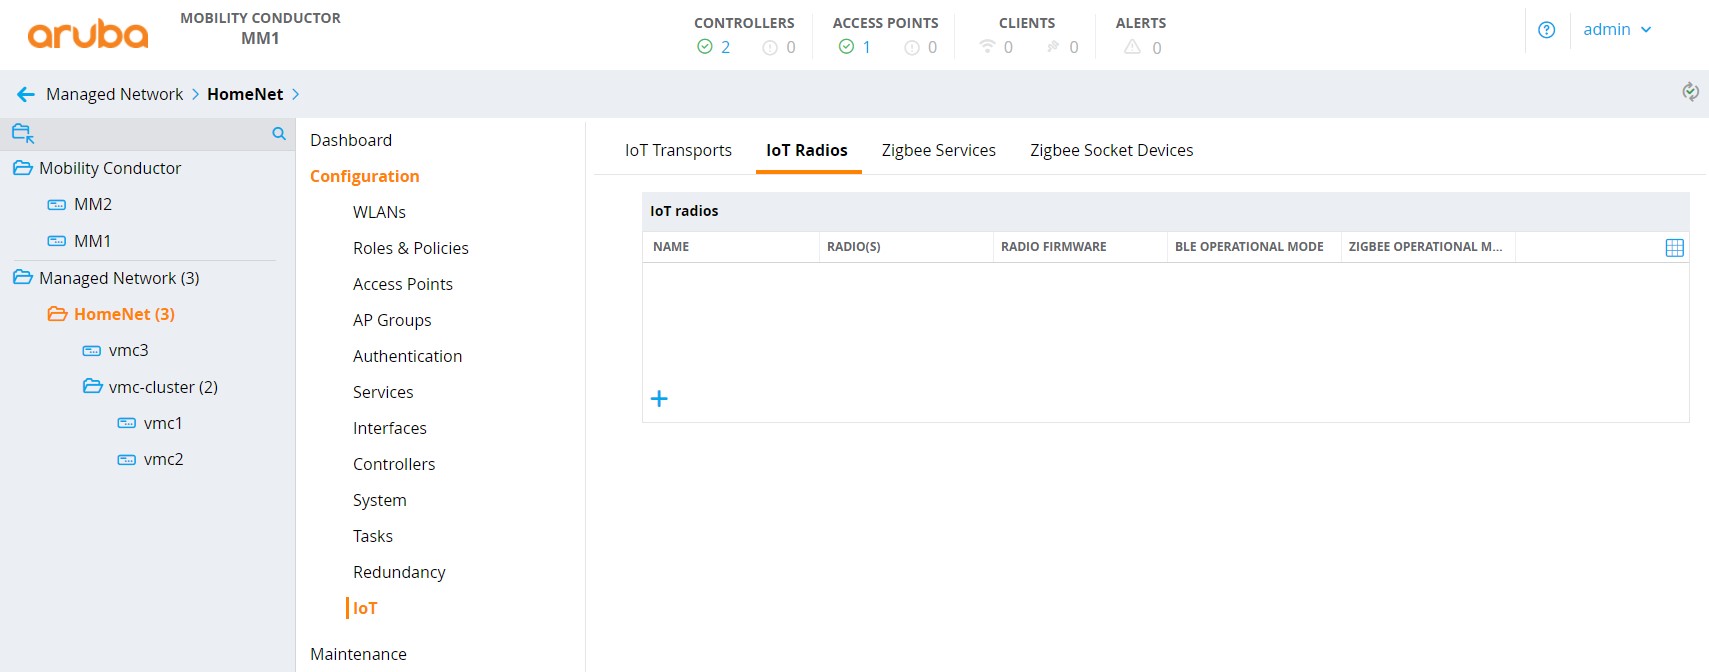
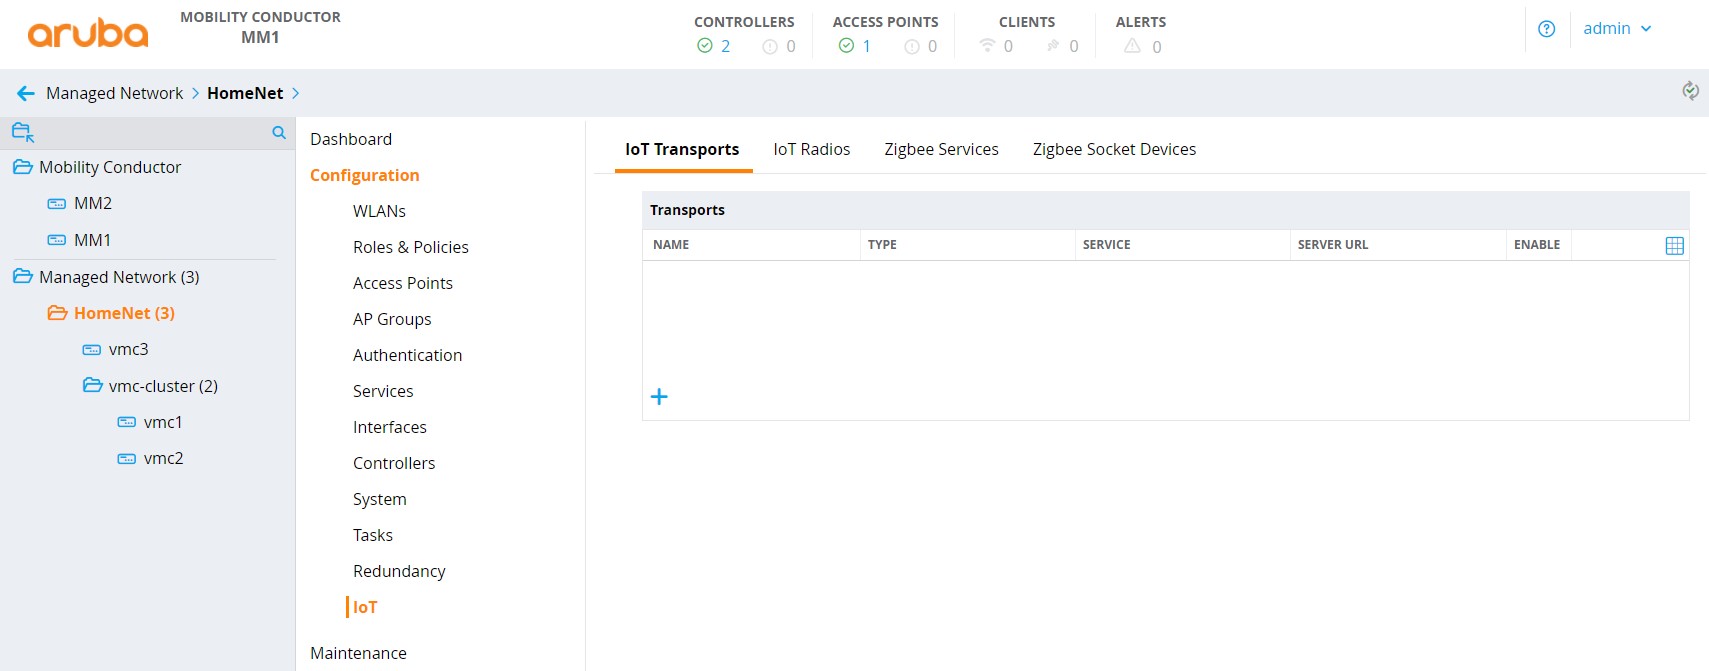
Select the desired device or device group under Managed Network. In the menu go to Configuration > IoT to open the IoT settings page.
-
Add a new iot radio configuration or change an existing one to enable the BLE mode of the Aruba AP’s IoT radio:
-
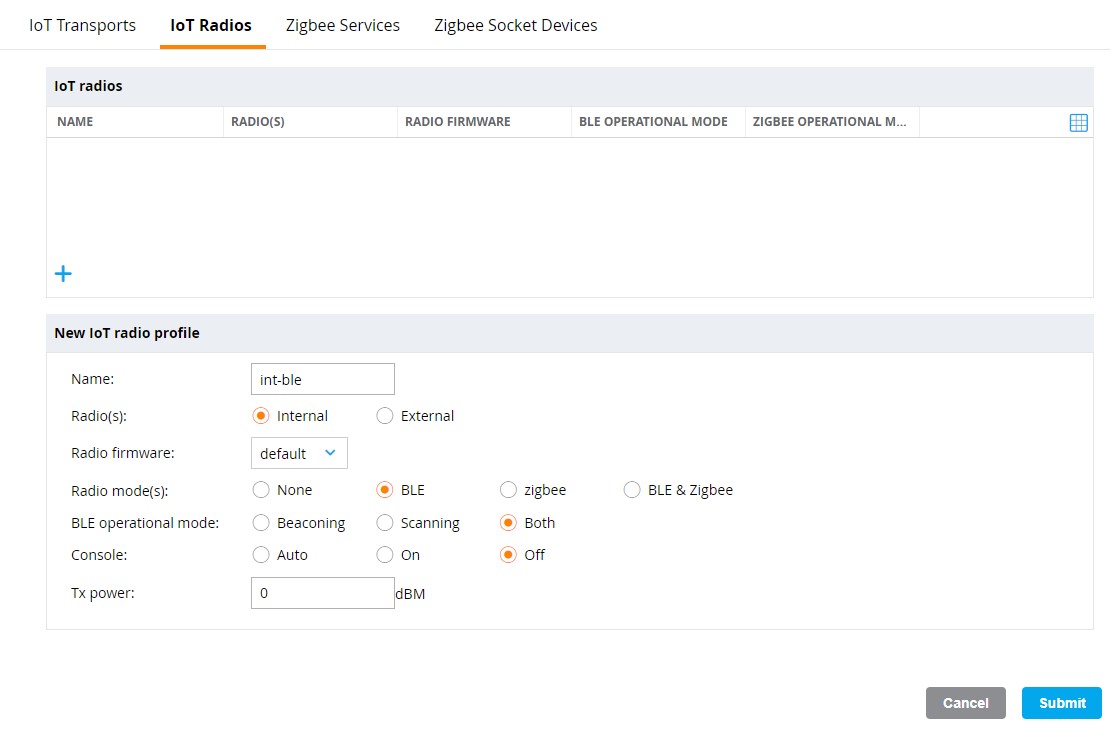
Click on the + icon in the IoT radios sub menu to add a new iot radio profile.
-
Enter a profile name.
-
Select the desired radio.
-
Set the radio mode to BLE.
-
Set the BLE operational mode to both.
-
Set the AP’s BLE console mode to the desired state.
-
Set the tx power to desired value, default is 0. This setting is only relevant when using BLE advertisements sent by the AP.
-
Click Submit to add the new iot radio profile to the configuration.
-
-
Apply the iot radio configuration to the desired AP group(s):
-
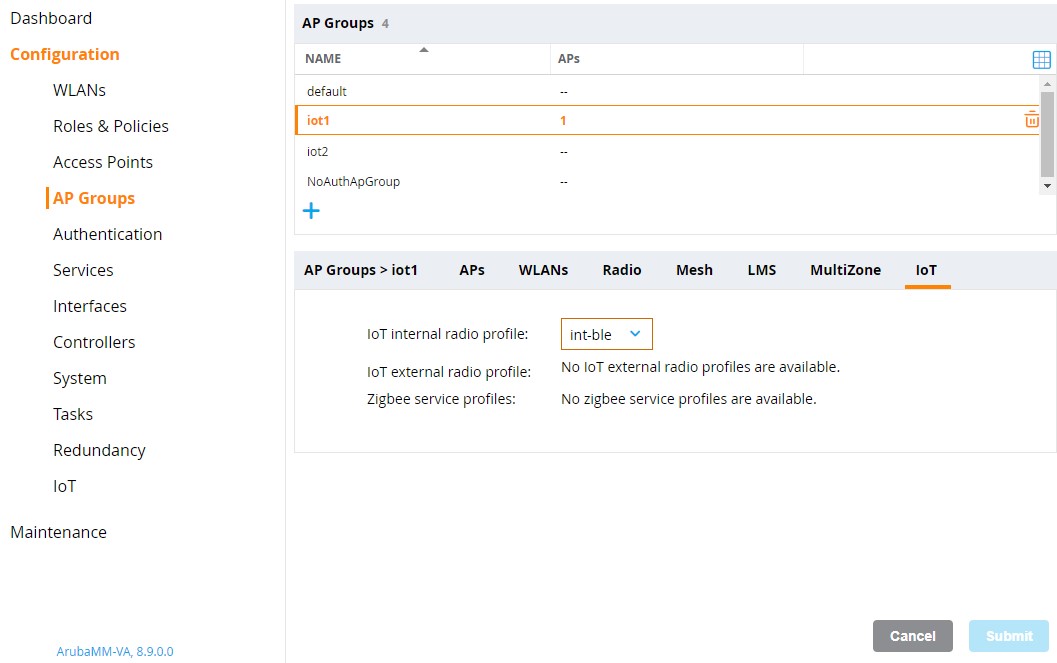
In the settings menu go to Configuration > AP Groups and select the desired AP Group to apply the iot radio configuration to.
-
Click on IoT to open the iot sub menu.
-
Select the previously configured iot radio profile for the internal or external BLE radio and click Submit to apply the profile.
-
(optional) Repeat steps 1-3 for any additional AP groups to be configured.
-
-
Add a new iot transport profile to configure the connectivity to the Blyott solution backend:
-
Select the desired device or device group under Managed Network. In the menu go to Configuration > IoT to open the IoT settings page.
-
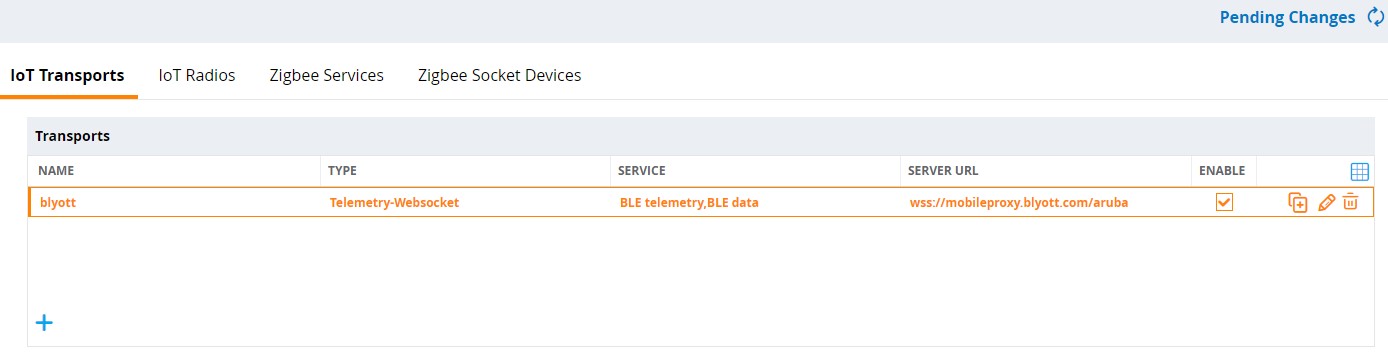
Click on the + icon in the IoT transports sub menu to add a new iot transport profile.
-
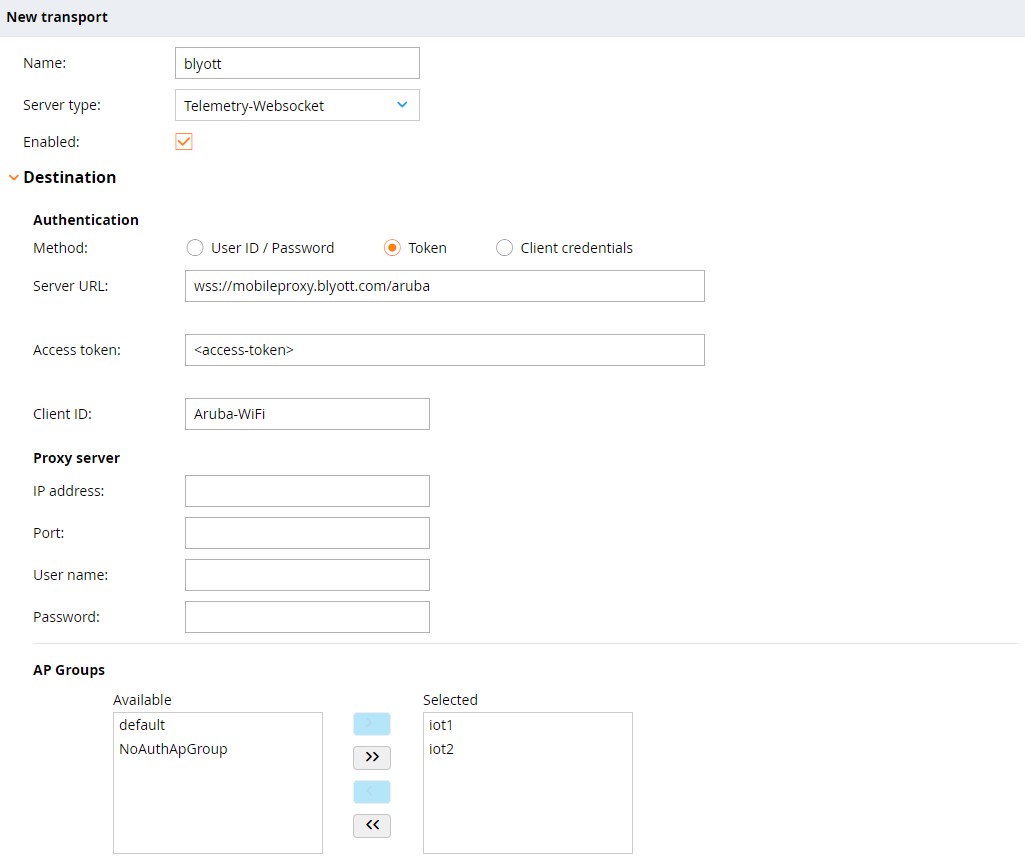
Enter a profile name.
-
Set server type to Telemetry Websocket.
-
Set the State switch to enabled.
-
Enter
wss://mobileproxy.blyott.com/arubaas server URL. -
In the destination section, select token as authentication method.
-
Enter the access token provided for your Blyott account.
-
Select the AP groups the iot transport profile should be applied to.
-
(optional) enter a client id.
-
(optional) enter proxy server information as required.
-
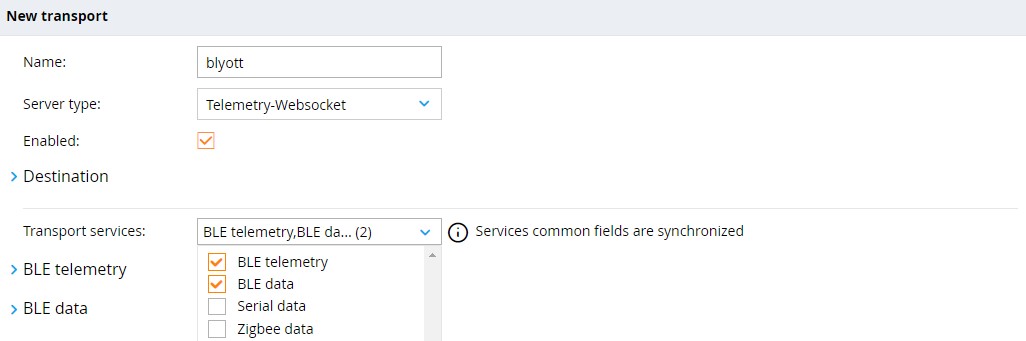
Select BLE data as transport service.
Note: The Transport service BLE telemetry is enabled by default and cannot be disabled.
-
Select blyott under BLE devices for the transport service BLE telemetry.
Note: The BLE device class blyott is supported with ArubaOS version 8.8 or higher.
-
Set the reporting interval to
3600 seconds. -
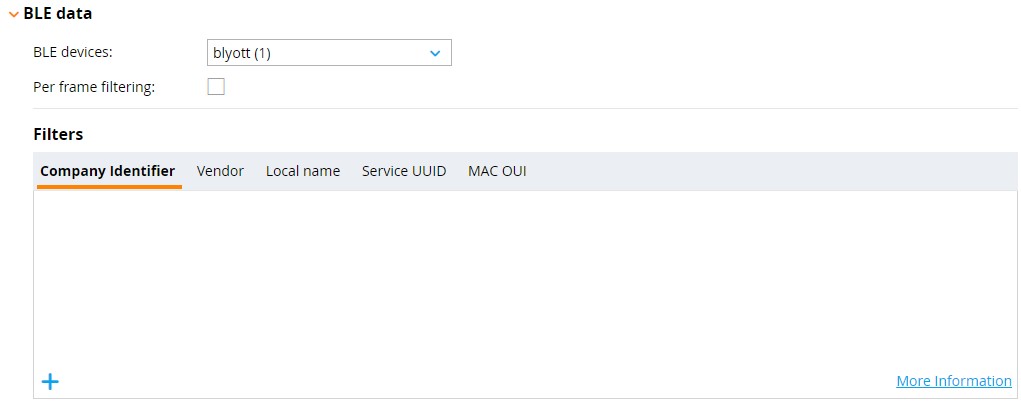
In the Filters section under Advanced enable the Report devices active during the last filter and set it to
30 seconds.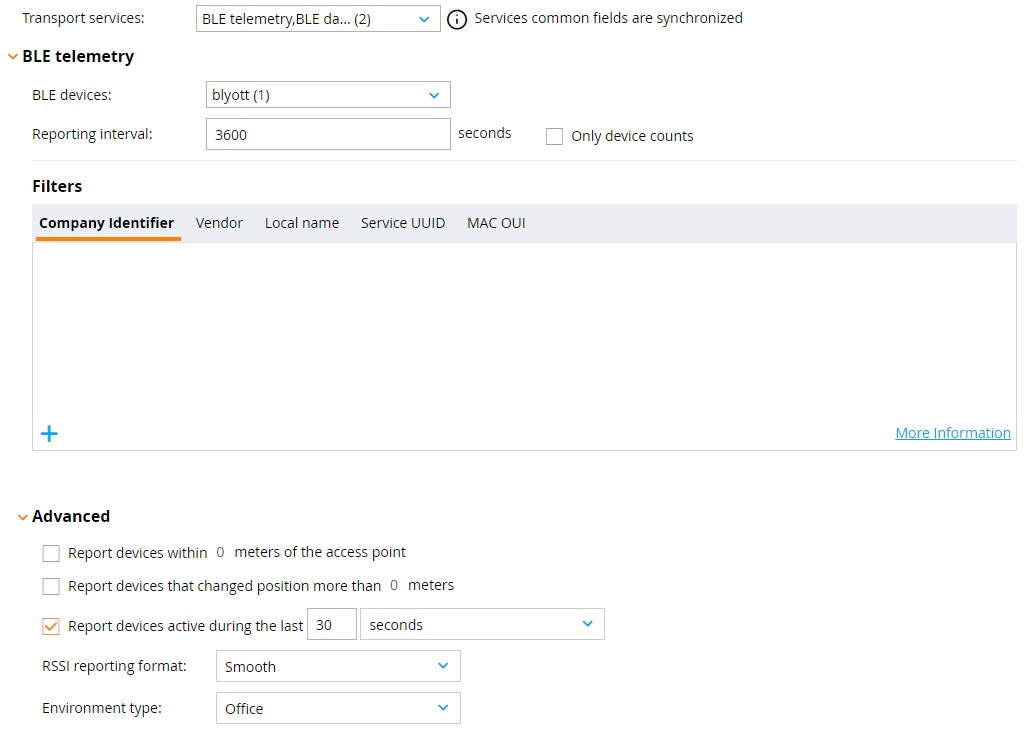
-
Select blyott under BLE devices for the transport service BLE Data.
Note: The BLE device class blyott is supported with ArubaOS version 8.8 or higher.
-
Click Submit to add the new iot transport profile to the configuration.
-
-
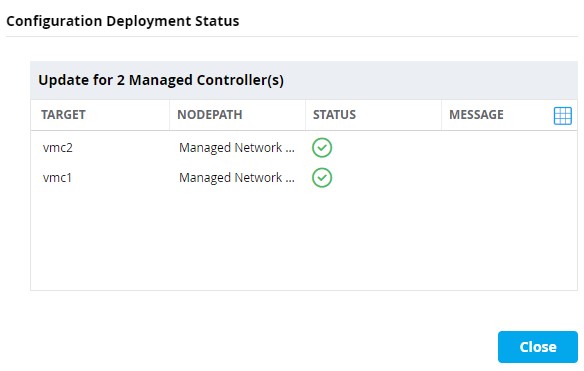
Click on Pending Changes and in the pop-up dialog Deploy changes to save and activate the configuration changes.

-
Wait until that the configuration changes have been successfully deployed to all selected devices.
ArubaOS configuration verification
ArubaOS locator status in Blyott dashboard
To verify if the applied configuration is working properly check the locator status in the Blyott dashboard. The Last Seen field should show 5 min or less.

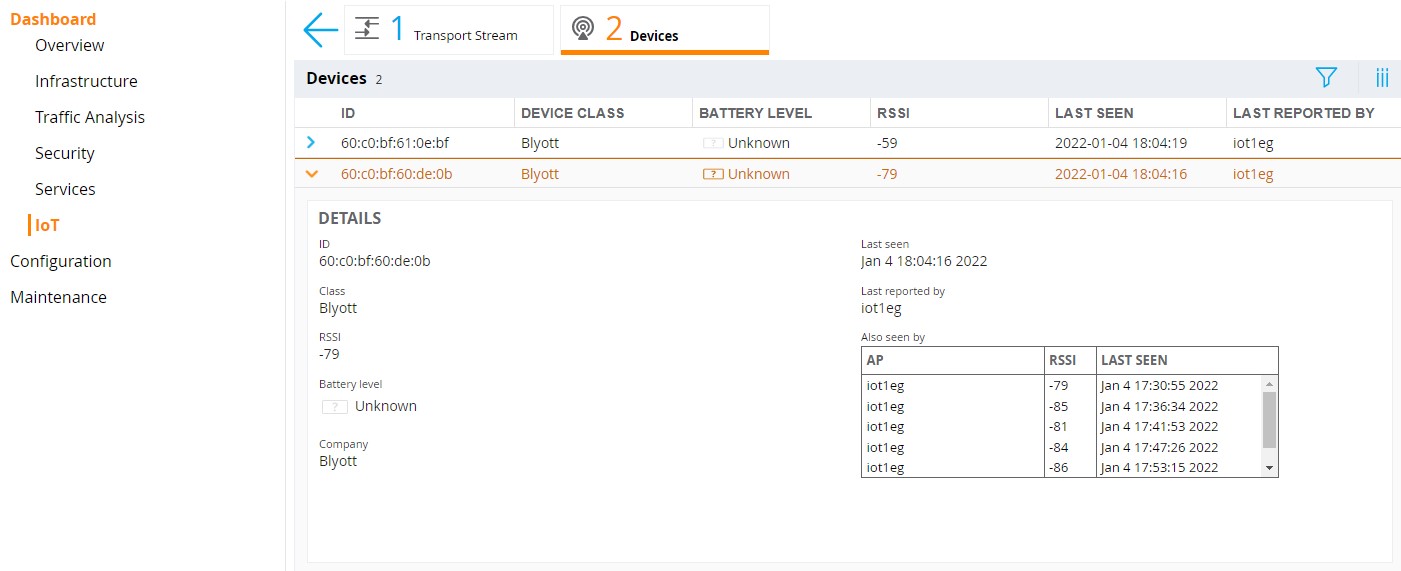
Aruba Mobility Conductor IoT dashboard
In Aruba Mobility Conductor setups running ArubaOS version 8.7.1.0 or higher the IoT dashboard on Mobility Conductor can be used to verify IoT transport stream and BLE device statistics.
Note:
The IoT dashboard is not available for Aruba Standalone Controller setups.
-
Login to the Aruba Mobility Conductor web interface.
-
Select the top level Managed Network in the configuration hierarchy. In the menu go to Dashboard > IoT to open the IoT dashboard page.
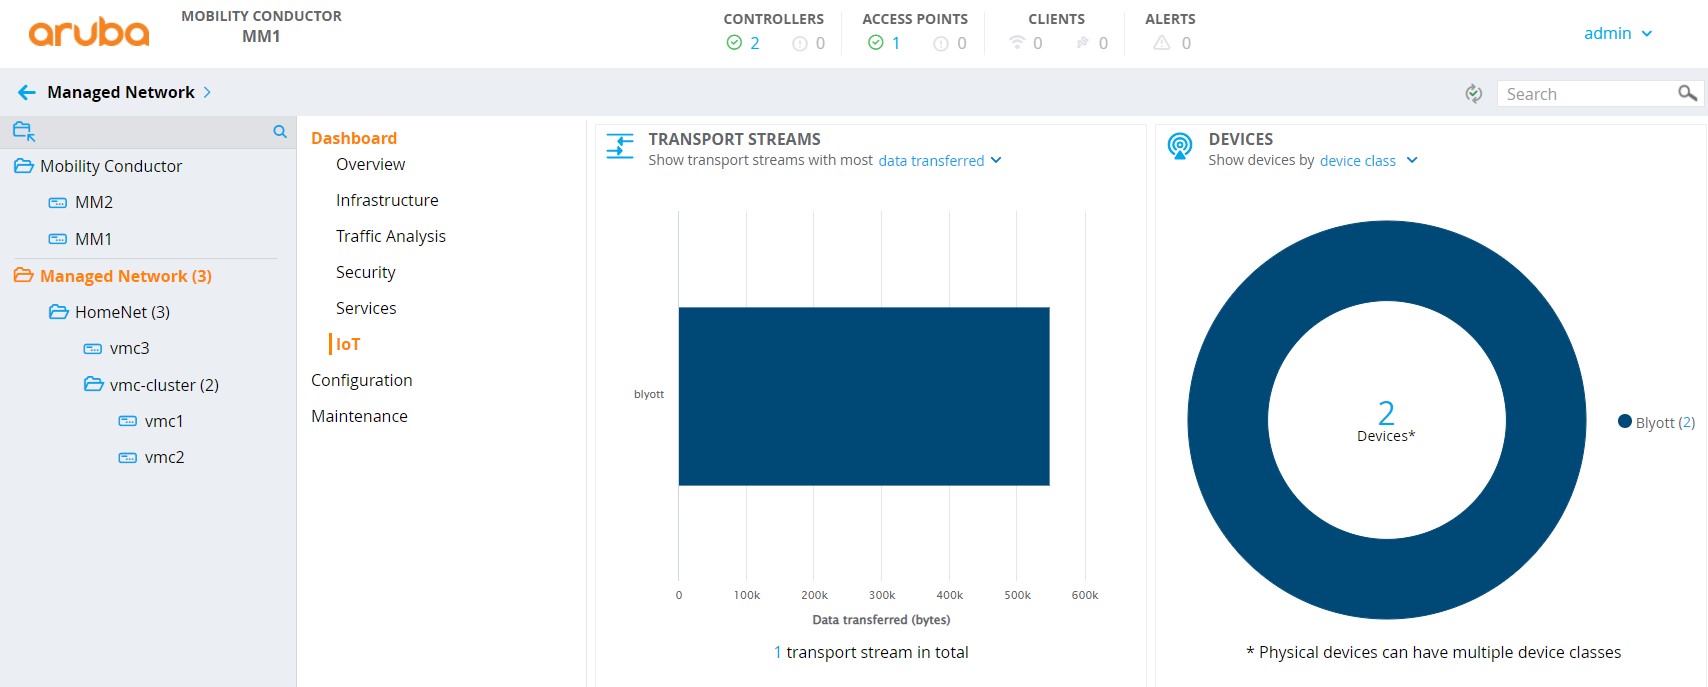
-
Check if the configured iot transport stream is listed in and the data transferred shows none zero values. Click on the specific transport stream in the dashboard to get details.
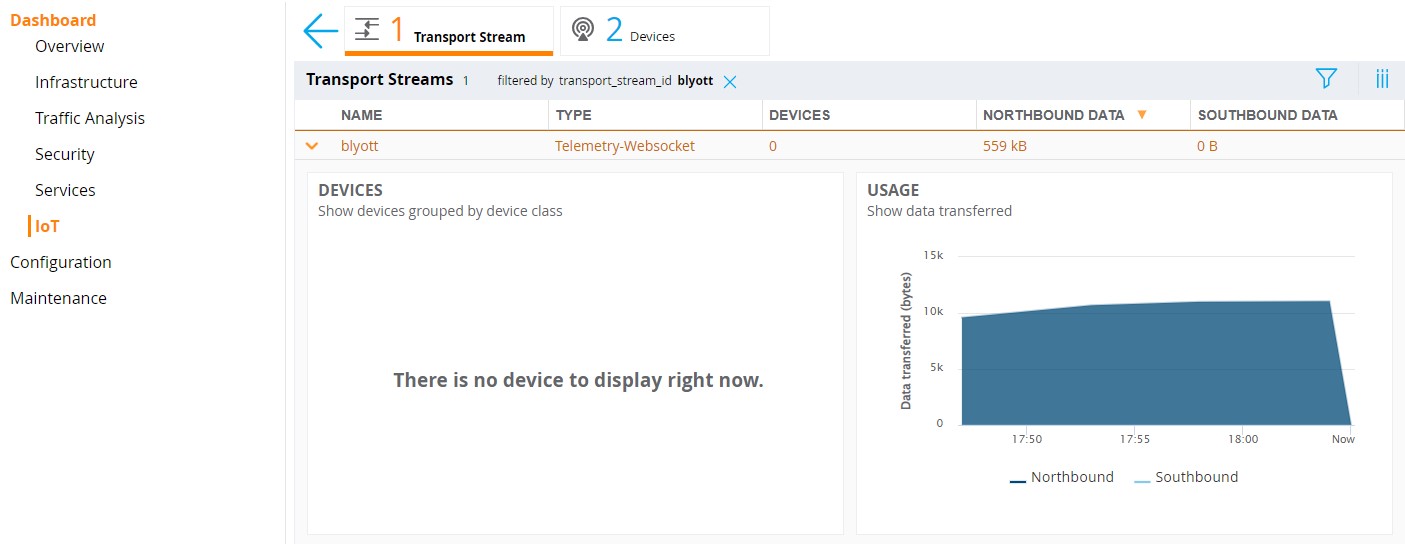
-
Check if blyott devices are shown in the device list. Click on the Devices number in the dashboard to get details.
Aruba Mobility Controller CLI
To verify the configuration on Aruba Mobility Controllers, in standalone mode or if managed by a Mobility Conductor, connect to the Aruba Mobility Controller using the SSH or the local console.
-
Check if Blyott BLE devices are seen by the APs BLE radio using the command show ap debug ble-table [ap-name|ip-addr|ip6-addr] generic :
 ArubaOS#show ap debug ble-table ap-name <ap-name> generic


 BLE Device Table [Generic]
 ---------------------------
 MAC                Address Type  RSSI  Last Update  Device Class  Generic Filter  BT-SIG Company IDs
 ---                ------------  ----  -----------  ------------  --------------  ------------------
 60:c0:bf:60:de:0b  Public        -82   I:3s         blyott        --              0x09CD
 60:c0:bf:61:0e:bf  Public        -56   I:32s        blyott        --              0x09CD

 Generic BLE devices:2
 Total BLE devices:2

 Note: Battery level for LS-BT1USB devices is indicated as USB.
 Note: Uptime is shown as Days hour:minute:second.
 Note: Last Update is time in seconds since last heard update.
 Note: Meas. Pow. is the averaged RSSI (in dBm) when the iBeacon is calibrated.
 Note: Tx_Power is shown in dBm in the APBs section for radios that support radio profile type 1. For all other APB radios, Tx_Power is a discrete level from 0-15.
 Status Flags:L:AP's local beacon; I:iBeacon; A:Beacon management capable
             :H:High power beacon; T:Asset Tag Beacon; U:Upgrade of firmware pending
             :u:Beacon management update received
 Generic Filter:S:serviceUUIDFilter; C:companyIdentifierFilter
             :M:macOuiFilter; L:localNameFilter
If no Blyott devices show up in the APs BLE table, check the following things:
-
Are Blyott BLE devices in the range of the AP?
-
Are the Blyott devices switched on?
-
Has the APs IoT radio been enabled with the settings shown in the configuration section?
-
Has the device class Blyott selected in the IoT transport configuration as shown in the configuration section?
-
-
Check if the IoT transport connection to the Blyott cloud backed has been established using the commands:
show ble_relay iot-profile
show ble_relay reportArubaOS#show ble_relay iot-profile ConfigID : 4 ---------------------------Profile[blyott]--------------------------- serverURL : wss://mobileproxy.blyott.com/aruba serverType : Telemetry Websocket deviceClassFilter : Blyott reportingInterval : 3600 second authentication-mode : none ageFilter : 30 second accessToken : <access-token, removed> clientID : Aruba-WiFi rssiReporting : Average environmentType : office bleDataForwarding : TRUE include_ap_group : iot1,iot2 Server Connection State -------------------------- TransportContext : Connection Established Last Data Update : 2022-01-04 18:23:30 Last Send Time : 2022-01-04 18:23:33 TransType : Websocket ArubaOS#show ble_relay report ---------------------------Profile[blyott]--------------------------- WebSocket Connect Status : Connection Established WebSocket Connection Established : Yes Location Id : Not Configured Websocket Address : wss://mobileproxy.blyott.com/aruba WebSocket Host : mobileproxy.blyott.com WebSocket Path : aruba Vlan Interface : Not Configured Current WebSocket Started at : 2022-01-04 17:29:26 Last Send Time : 2022-01-04 18:23:36 Websocket Write Stats : 687 (106481B) Websocket Write WM : 0B (0) Websocket Read Stats : 0 (0B)If the websocket connection status show a different status than Connection Established use the following command to check possible connection issues:
show ble-relay ws-log <profile>
-
If the connection status shows Connection Established but the communication seems not to be working correctly, use the following command to check message processing thought the websocket connection:
show ble_relay tag-report
Note: Repeat the show command multiple times to see if messages counters increase. The Tag messages dropped should not increase and show only a low amount of dropped packets compared to incoming and processed messages, e.g. in the 0.x % range.
 ArubaOS#show ble_relay tag-report


 ---------------------------Profile[blyott]---------------------------

 Incoming Tag messages                   : 745
 Tag messages processed                  : 734
 Tag messages dropped                    : 11
 Tag messages WS queue success           : 734
 Tag messages WS queue unavailable       : 0
 Tag messages WS not connected           : 1
 Tag messages WS sent                    : 734
 Heartbeat messages WS sent              : 915
ArubaOS - Common causes of connection errors
- Trusted certificate chain for remote IoT server certificate not installed. Only applicable for secure connections (https://, wss://)
- Wrong authentication credentials for the remote IoT server connection (access token, username/password, clientid/secret)
- Domain name resolution not configured or not working e.g. DNS server not reachable
- Connection blocked firewall or other devices in the communication path
Note:
Starting with ArubaOS 8.8 IoT server connections are automatically established from the Mobility Controller even if no messages need to be send to the remote server e.g. because no BLE devices are seen by the Aruba AP, as long as at least one AP is connected to the controller with a configured iot transport profile.
Aruba Instant
Aruba Instant CLI Configuration
iot radio-profile "ble-int"
 radio-mode ble
 exit

iot use-radio-profile "ble-int"

iot transportProfile "blyott"
 endpointType telemetry-websocket
 endpointURL "wss://mobileproxy.blyott.com/aruba"
 endpointID "Aruba-WiFi"
 endpointToken <access-token>
 payloadContent blyott
 transportInterval 3600
 ageFilter 30
 bleDataForwarding

 exit

iot useTransportProfile "blyott"
Aruba Instant GUI Configuration
Note:
The example screenshots provided below shows the Aruba Instant version 8.9 GUI. Even if the Aruba Instant version 8.8 GUI has a slightly different look and feel the same configuration settings still apply.
-
Login to the Aruba Instant access point web interface.
-
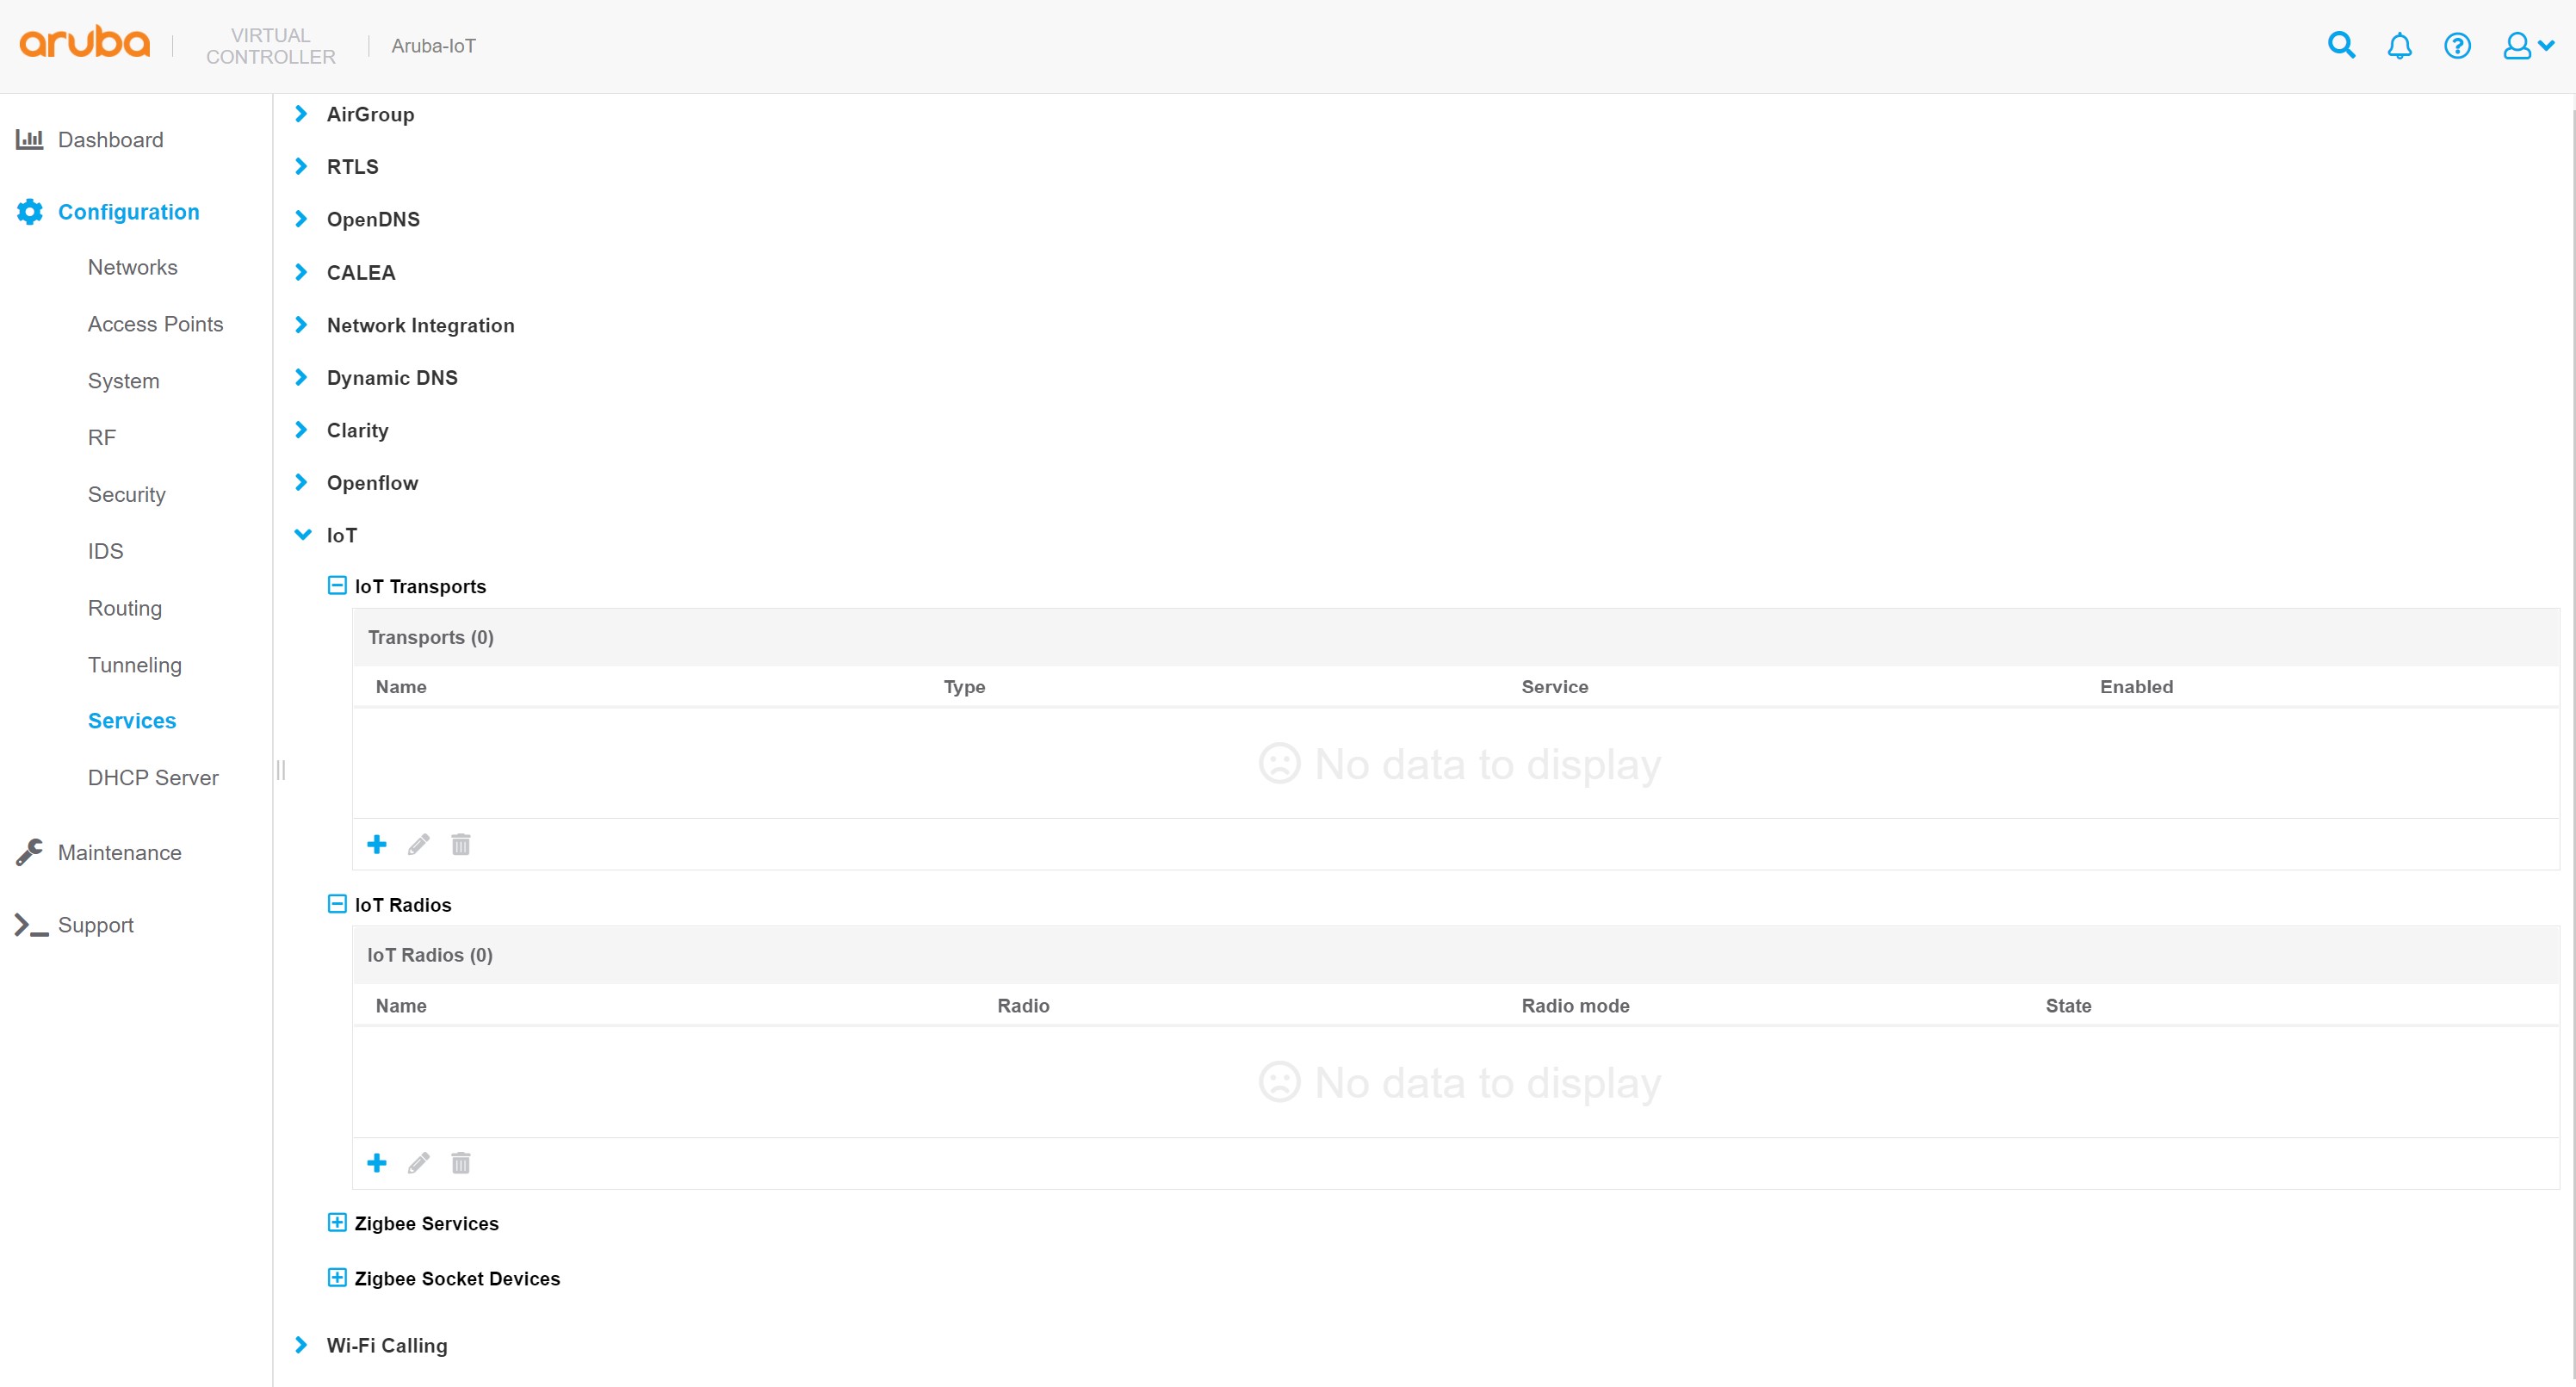
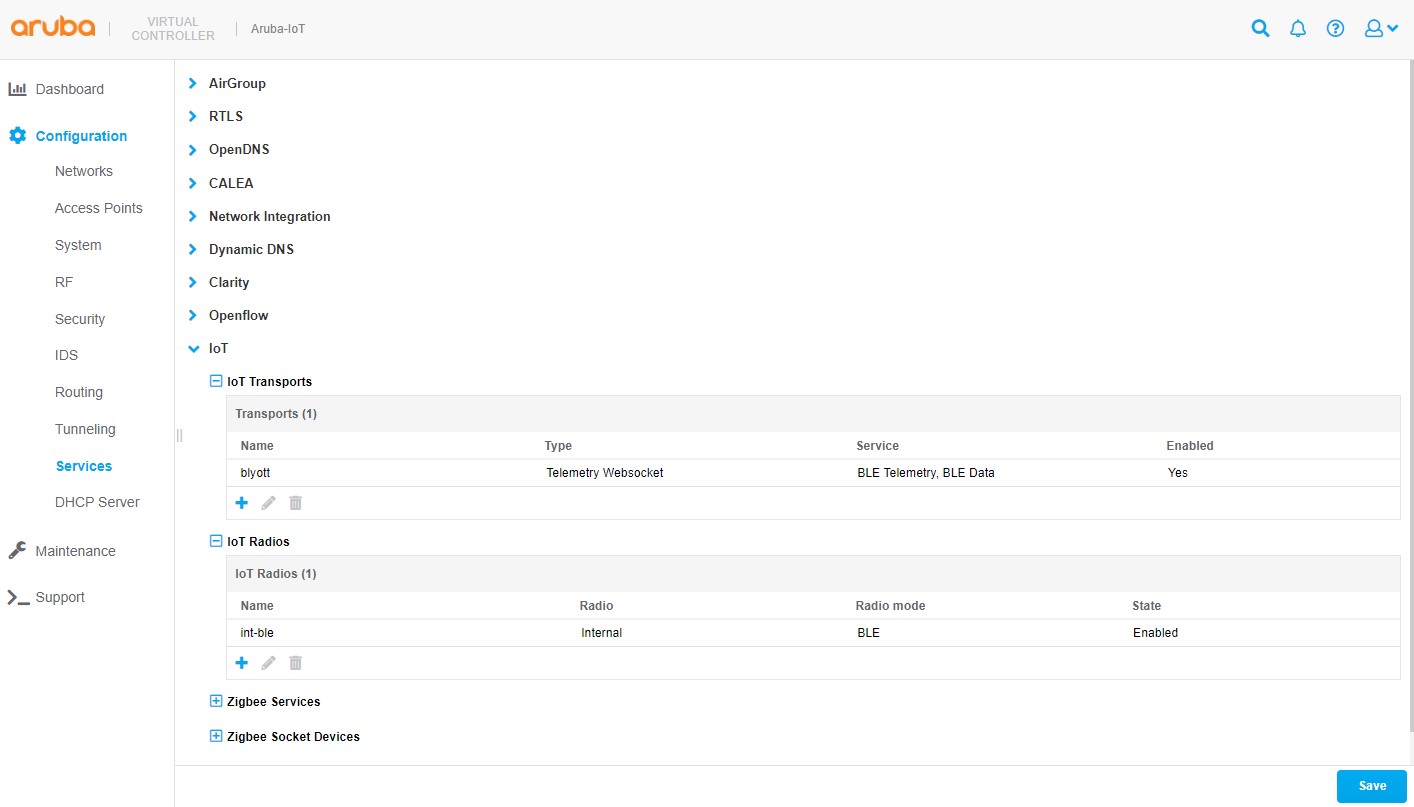
In the menu on the left side go to Configuration > Services and open the sub menu IoT in the main window.
-
Add a new iot radio configuration or change an existing one to enable the BLE mode of the Aruba AP’s IoT radio:
-
Click on the + icon in the IoT radios sub menu to add a new iot radio profile.
-
Enter a profile name.
-
Set the state switch to enabled.
-
Select the desired radio.
-
Set the radio mode to BLE.
-
Set the BLE operational mode to both.
-
Set the AP’s BLE console mode to the desired state.
-
Set the tx power to desired value, default is 0. This setting is only relevant when using BLE advertisements sent by the AP.
-
Click OK to close the iot radio profile dialog.
-
-
Add a new iot transport profile to configure the connectivity to the Blyott solution backend:
-
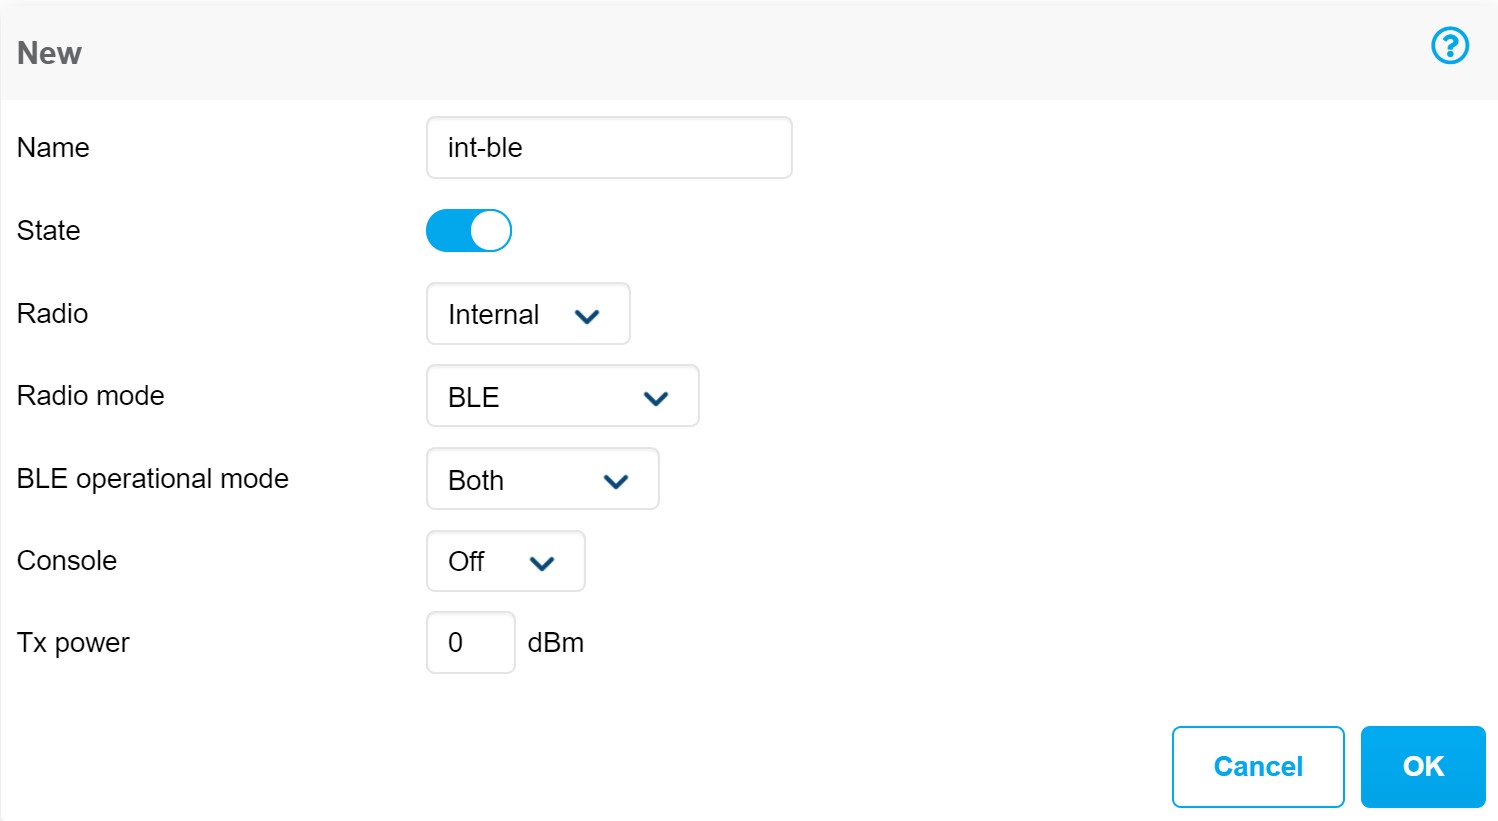
Click on the + icon in the IoT transports sub menu to add a new iot transport profile.
-
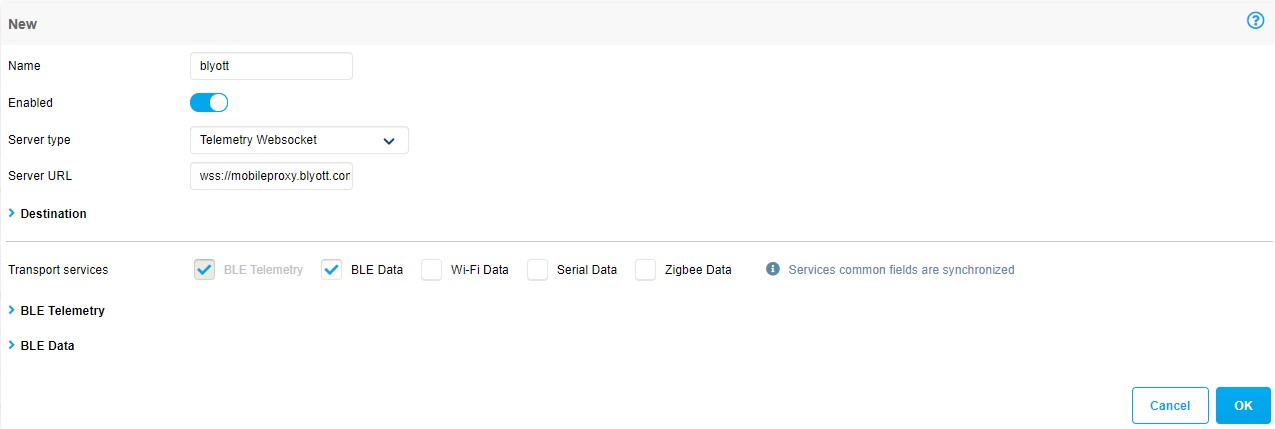
Enter a profile name.
-
Set the State switch to enabled.
-
Set server type to Telemetry Websocket.
-
Enter
wss://mobileproxy.blyott.com/arubaas server URL. -
In the destination section, select token as authentication method.
-
Enter the access token provided for your Blyott account.
-
(optional) enter a client id.
-
(optional) enter then desired VLAN ID that should be used for the server communication. Leave empty if the APs management VLAN is used.
-
(optional) enter proxy server information as required.
-
Select BLE Data as transport service.
Note: The Transport service BLE telemetry is enabled by default and cannot be disabled.
-
Select Blyott under BLE devices for the transport service BLE telemetry.
Note: The BLE device class Blyott is supported with Aruba Instant version 8.8 or higher.
-
Set the reporting interval to
3600 seconds.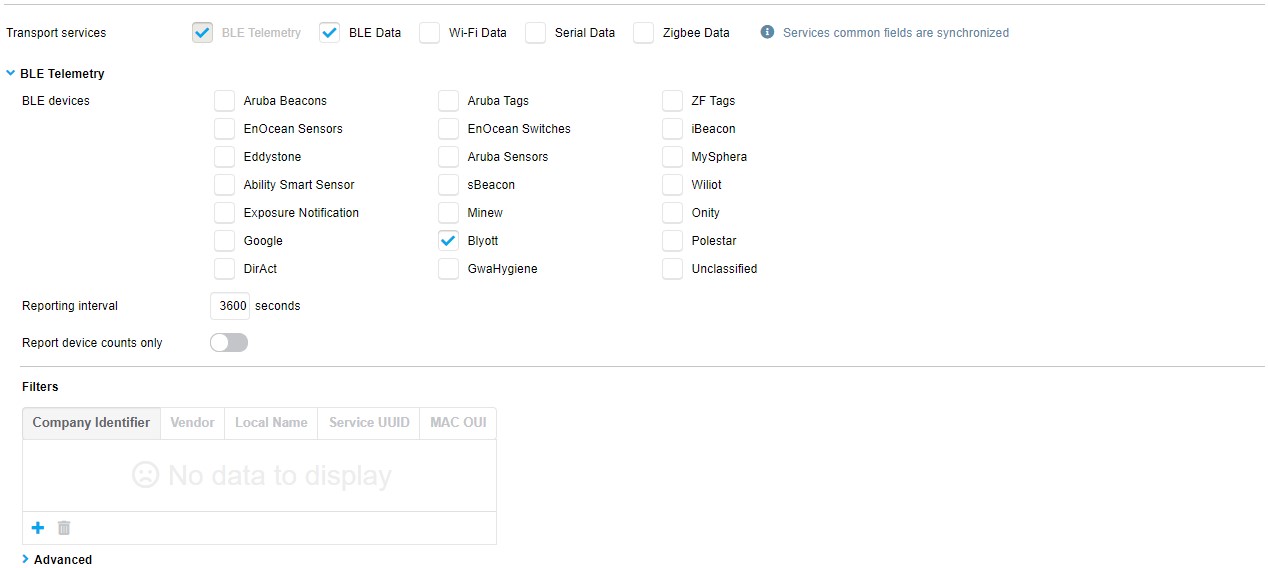
-
In the Filters section under Advanced enable the Report devices that have had activity in the last filter and set it to
30 seconds.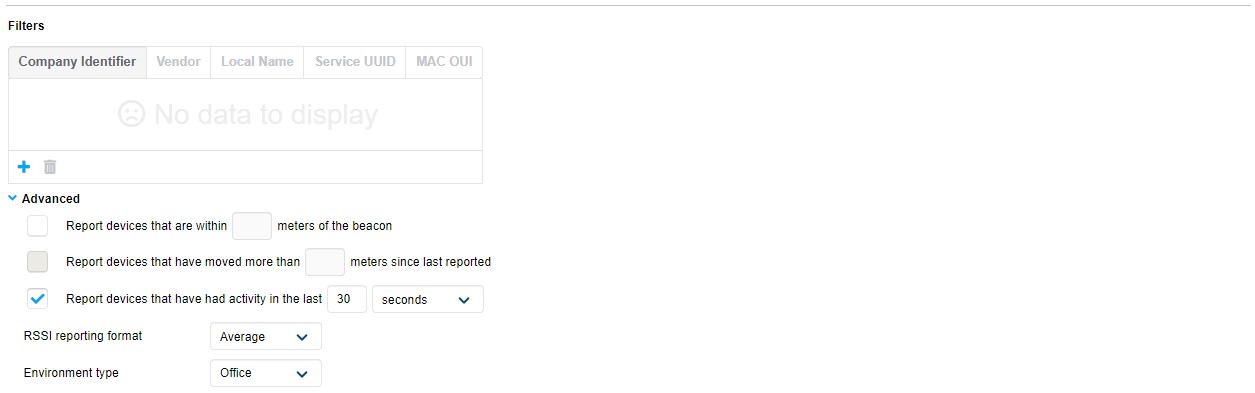
-
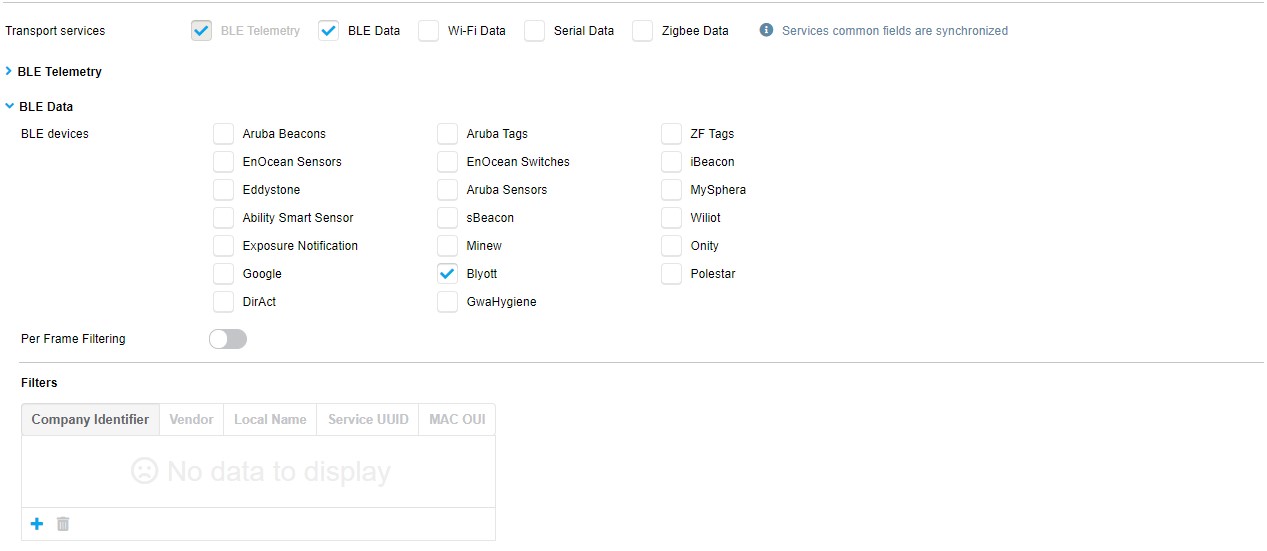
Select Blyott under BLE devices for the transport service BLE Data.
Note: The BLE device class Blyott is supported with Aruba Instant version 8.8 or higher.
-
Click OK to close the iot transport profile dialog.
-
-
Click on Save to save and activate the configured settings.
Configuration verification
Aruba Instant locator status in Blyott dashboard
To verify if the applied configuration is working properly check the locator status in the Blyott dashboard. The Last Seen field should show 5 min or less.

Aruba Instant access point CLI
To verify the configuration on the Aruba side, connect to the Aruba Instant access point using the SSH or the local console.
-
Check if Blyott BLE devices are seen by the APs BLE radio using the command show ap debug ble-table generic:
 ArubaInstantAP# show ap debug ble-table generic


 BLE Device Table [Generic]
 ---------------------------
 MAC                Address Type  RSSI  Last Update  Device Class  Generic Filter  BT-SIG Company IDs
 ---                ------------  ----  -----------  ------------  --------------  ------------------
 60:c0:bf:60:de:0b  Public        -77   I:5s         blyott        --              0x09CD
 60:c0:bf:61:0e:bf  Public        -43   I:3s         blyott        --              0x09CD


 Generic BLE devices:2
 Total BLE devices:2

 Note: Battery level for LS-BT1USB devices is indicated as USB.
 Note: Uptime is shown as Days hour:minute:second.
 Note: Last Update is time in seconds since last heard update.
 Note: Meas. Pow. is the averaged RSSI (in dBm) when the iBeacon is calibrated.
 Note: Tx_Power is shown in dBm in the APBs section for radios that support radio profile type 1. For all other APB radios, Tx_Power is a discrete level from 0-15.
 Status Flags:L:AP's local beacon; I:iBeacon; A:Beacon management capable
             :H:High power beacon; T:Asset Tag Beacon; U:Upgrade of firmware pending
             :u:Beacon management update received
 Generic Filter:S:serviceUUIDFilter; C:companyIdentifierFilter
             :M:macOuiFilter; L:localNameFilter
If no Blyott devices show up in the APs BLE table, check the following things:
-
Are Blyott BLE devices in the range of the AP?
-
Are the Blyott devices switched on?
-
Has the APs IoT radio been enabled with the settings shown in the configuration section?
-
Has the device class Blyott selected in the IoT transport configuration as shown in the configuration section?
-
-
Check if the IoT transport connection to the Blyott cloud backed has been established using the commands:
show ap debug ble-relay iot-profile
show ap debug ble-relay reportArubaInstantAP# show ap debug ble-relay iot-profile ConfigID : 90 ---------------------------Profile[blyott]--------------------------- serverURL : wss://mobileproxy.blyott.com/aruba serverType : Telemetry Websocket deviceClassFilter : Blyott reportingInterval : 3600 second authentication-mode : none ageFilter : 30 second accessToken : <access-token, removed> clientID : Aruba-WiFi rssiReporting : Average environmentType : office bleDataForwarding : TRUE Server Connection State -------------------------- TransportContext : Connection Established Last Data Update : 2021-10-21 13:52:03 Last Send Time : 2021-10-21 13:52:03 TransType : Websocket ArubaInstantAP# show ap debug ble-relay report ---------------------------Profile[blyott]--------------------------- WebSocket Connect Status : Connection Established WebSocket Connection Established : Yes Location Id : Not Configured Websocket Address : wss://mobileproxy.blyott.com/aruba WebSocket Host : mobileproxy.blyott.com WebSocket Path : aruba Vlan Interface : Not Configured Current WebSocket Started at : 2021-10-21 13:40:13 Web Proxy : NA Proxy Username&password : NA, NA Last Send Time : 2021-10-21 13:52:54 Websocket Write Stats : 277 (39080B) Websocket Write WM : 0B (0) Websocket Read Stats : 0 (0B)If the websocket connection status show a different status than Connection Established use the following command to check possible connection issues:
show ap debug ble-relay ws-log <profile>
-
If the connection status shows Connection Established but the communication seems not to be working correctly, use the following command to check message processing thought the websocket connection:
show ap debug ble-relay tag-report
Note: Repeat the show command multiple times to see if messages counters increase. The Tag messages dropped should not increase and show only a low amount of dropped packets compared to incoming and processed messages, e.g. in the 0.x % range.
 ArubaInstantAP# show ap debug ble-relay tag-report

 ---------------------------Profile[blyott]---------------------------

 Incoming Tag messages                   : 305
 Tag messages processed                  : 301
 Tag messages dropped                    : 4
 Tag messages WS queue success           : 301
 Tag messages WS queue unavailable       : 0
 Tag messages WS not connected           : 0
 Tag messages WS sent                    : 301
 Heartbeat messages WS sent              : 181
Aruba Instant - Common causes of connection errors
- Trusted certificate chain for remote IoT server certificate not installed. Only applicable for secure connections (https://, wss://)
- Wrong authentication credentials for the remote IoT server connection (access token, username/password, clientid/secret)
- Domain name resolution not configured or not working e.g. DNS server not reachable
- Connection blocked firewall or other devices in the communication path
Note:
Starting with Aruba Instant 8.8 IoT server connections are automatically established even if no messages need to be send to the remote server e.g. because no BLE devices are seen by the Aruba AP.
Aruba Central (2.5.4 or higher)
Aruba Instant 8.x Configuration
t.b.d.
AOS10/IoT-Operations (beta)
t.b.d.